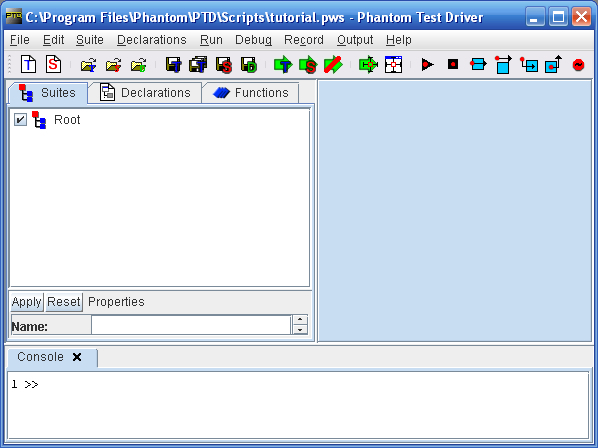
This tutorial will describe how to create and run PTD suites
and testcases. It will also briefly cover
workspaces and how to view input and
output. The tutorial and subsequent tutorials
will make use of the PhantomTarget.exe application (located in the
PTD installation directory) and some sample scripts included with
PTD (located in the 'scripts' subdirectory of the PTD installation
directory).
The first step in this tutorial will be to create a new workspace.
This workspace will be used by all subsequent tutorials. Workspaces
are used to keep track of commonly used scripts and declarations files.
Whenever a workspace is opened, the suite and declarations files associated
with the workspace are automatically opened. Additionally, all scripts
that were open when the workspace was last used will be opened.
Create the new Workspace by selecting 'File' and then 'New Workspace'
from the main menu. This will display a prompt to save then close
any open scripts and clear the Suite window.
Next, save the new Workspace. Do this by selecting 'File' and then
'Save Workspace' from the main menu. This
will open a dialog requesting a path and name to save the workspace
as. Navigate to the 'scripts' folder where PTD was installed (note:
this is nominally 'C:\Program Files\Phantom', but could be different
depending on your installation), and save the workspace as 'tutorial.pws'.
Now that the workspace is set up, the next step is to set up the suite.
When the new workspace was created, a new suite was automatically
created. Currently, there are no items in the suite except the root
suite, titled 'Root'. Change the name of the 'Root' suite by selecting
it in the Suite Viewer. The Suite properties panel will show information
about the Suite, including the name. Change the name to 'Tutorial'
in the Suite properties panel, then click 'Apply'.
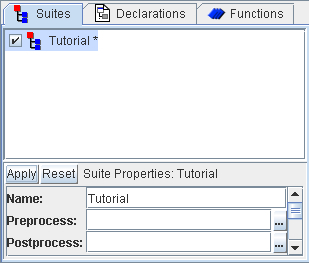
Notice that the Suite viewer will now show a root suite with the name
'Tutorial *'. The '*' indicates that the suite has not been saved.
Save the suite by selecting 'Suite' then 'Save' from the main menu.
A dialog will appear asking for the path and name where the suite
should be saved. Navigate to the 'scripts' folder in the PTD installation
directory and save the suite as 'tutorial.sui'. The Tutorial suite
is now saved (the '*' should disappear). This suite will be automatically
loaded whenever the Tutorial workspace is loaded.
The root suite is simply a holder for all subsuites and testcases.
It does not perform any actions (with the exception of pre- or post-processors).
A testcase needs to be added that will contain a script. To create
a new testcase, right-click the 'Tutorial' suite. Select 'Insert'
and then 'Testcase' from the menu that appears. This will insert a
new testcase called 'New Testcase'.
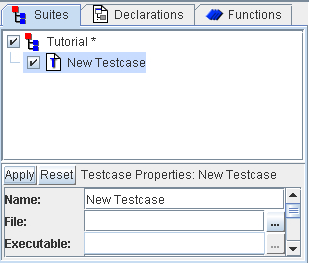
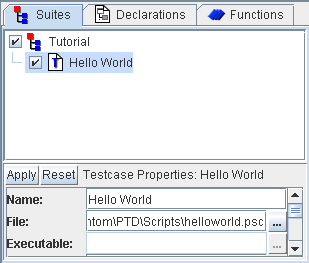
Change the name of the new testcase by selecting the testcase and
changing the name to 'Hello World' in the Testcase properties panel.
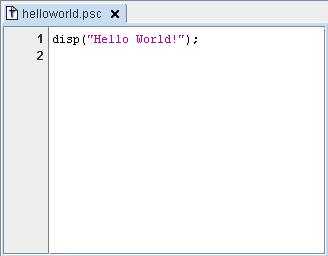
The testcase should be associated with a script, so click the '...'
button next to the 'File' edit field. A dialog will appear requesting
the path and name of the script to open. Navigate to the 'scripts'
folder in the PTD installation directory and select 'helloworld.psc'.
Click 'Open'. The full path to the script will appear in the 'File'
field. Click 'Apply' to apply the changes to the new testcase, and
then save the suite by selecting 'Suite' then 'Save' from the main
menu.
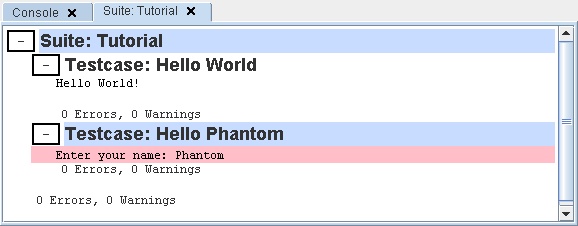
The 'Tutorial' suite now has one testcase associated with it: 'Hello
World'. When the Suite is run, the script associated with the the
testcases will be run. To run the 'Tutorial' suite, select it in the
Suite viewer. With the suite selected, select 'Run' then 'Suite' from
the main menu. Script execution will begin immediately, and 'Hello
World' should appear in the output area.The output has two sections,
one for the 'Tutorial' suite and one for the 'Hello World' testcase.
The 'Hello World' output is nested inside the 'Tutorial' output, and
is known as a child output (similarly, the 'Hello World' testcase
is a child to the 'Tutorial' suite). The output for each item can
be hidden by clicking the '-' box next to the output name. Note that
when the 'Tutorial' '-' box is clicked, the entire suite output is
hidden. To show the output again, click the '+' box.

At the end of each output is a line showing the total number of errors
and warnings that occurred during the execution. In this case, both
counters are zero because no errors should have occurred. The counter
at the end of each testcase shows the error and warning count only
for that testcase. The counter at the end of each suite shows the
cumulative error and warning counts for the suite and all child suites
and testcases contained in the suite. Close the output by clicking
the 'x' ( ) in the
output tab.
) in the
output tab.
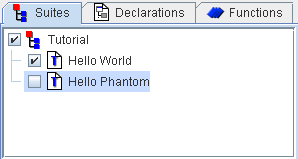
Suites are useful for combining testcases into a single group. Add
another testcase to the suite following the same steps as for the
'Hello World' testcase, except set the name to 'Hello Phantom' and
select the 'hellophantom.psc' script in the 'scripts' directory where
PTD was installed. Now the suite contains two testcases: 'Hello World'
and 'Hello Phantom'.

Before running the new suite, note that the 'Hello Phantom' script
will request some user input. When this occurs, the output area of
the script will turn red. Enter the input requested and click 'Enter'.
The script will continue, using the input entered. Additionally, the
script will display an alert dialog (see the Phantom 'Alert' function)
which must be closed before the script will continue.
Run the Tutorial suite by selecting it and selecting 'Suite' then
'Run' from the main menu. As before, the scripts associated with the
suite will begin executing: first 'helloworld.psc' and then 'hellophantom.psc'.
When the second script runs, it will request the input as described
previously. As the scripts run, the output will appear in the output
panel.
Note now that the output panel contains three outputs: the 'Tutorial'
suite output and the 'Hello World' and 'Hello Phantom' testcase outputs.
Also, notice that when a suite or testcase is run, the title bar for
each item in the output displays a blue color. The color will be blue
as long as the testcase is running. For a suite, the color will be
blue until all child items are finished executing.
The output from a run can be saved to either a text or HTML file.
To do this, select the tab in the output panel that contains the output
to save, and then select 'Output' then 'Export As...' from the main
menu. Select the format to save as. A dialog will appear requesting
a path and name for where the output should be saved. Enter a file
name and click 'Save'. The output can now be viewed with a text editor
or in a web browser (for text and HTML, respectively).
Close the output again by clicking the 'x' ()
in the output tab.
Nominally, when a suite is run all the child items in a suite are
run. To prevent a child suite or child testcase from running, uncheck
the checkbox ( ) next
to the suite or testcase name. When the suite is run, only the checked
items will be run. Note that when a suite is saved, the check states
of all child items are saved as well. Uncheck the 'Hello Phantom'
testcase and run the 'Tutorial' suite. Notice that only the 'Hello
World' testcase was run.
) next
to the suite or testcase name. When the suite is run, only the checked
items will be run. Note that when a suite is saved, the check states
of all child items are saved as well. Uncheck the 'Hello Phantom'
testcase and run the 'Tutorial' suite. Notice that only the 'Hello
World' testcase was run.
The suite viewer can be used to manage all the items in a suite. For
example, a testcase script can be edited by selecting the testcase
and then selecting 'Suite' then 'Edit' from the main
menu. The associated script will open in the script editor and
changes can be made to it. To save the script, select 'File' then
'Save' from the main menu. Additionally, the suite items can be copied
and pasted. To copy and paste suite items, select the item and select
'Edit' from the main menu. In the 'Edit' menu, you can select 'Copy',
'Cut', 'Paste', etc... to manage the contents of the suite.
To run an individual script without running a suite, open the script
in the editor. This can be done by either selecting a testcase and
editing the script as described previously, or by selecting 'File'
then 'Open' from the main menu. To run the script, select 'Run' then
'Script' from the main menu.
Select the 'Hello World' script in the suite viewer and open the script
by selecting 'Suite' then 'Edit' from the main menu. The 'Hello World'
script will open as a new tab in the script editor area. Run the script
by selecting 'Run' then 'Script' from the main menu. The 'helloworld.psc'
script will immediately run, with the output appearing in the output
area.
Finally, save the workspace by selecting 'File' then 'Save Workspace'
from the main menu. This workspace can now be used for future tutorials.
This tutorial covered some of the basics of creating and running testcases
and suites. The next tutorial
will describe how to use Window Declarations with the Window
Declarations Editor.